Disassembly and Inspection Guide of Plate Heat Exchanger
On this page
Plate heat exchangers are an essential thermal exchange equipment in modern industry, widely used in fields such as chemical engineering, pharmaceuticals, and food processing. Their high thermal exchange efficiency plays a significant role in energy conservation and consumption reduction. To ensure the stability and efficiency of plate heat exchangers during long-term operation, regular disassembly and inspection are crucial. The following is a detailed guide for the disassembly and inspection of plate heat exchangers, aimed at helping operators to effectively maintain equipment and prevent potential failures.

Preparation Before Disassembly
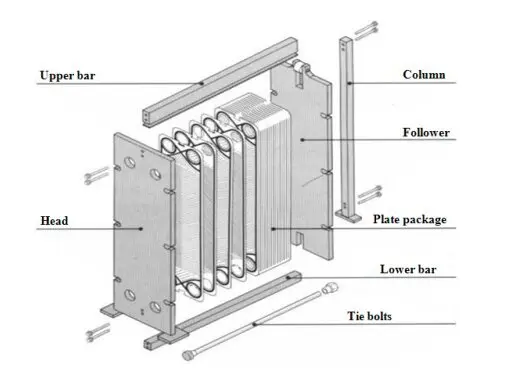
Before disassembling the plate heat exchanger, it is essential to accurately measure and record the compression length of the plate pack. This dimension is very important when reassembling, as it helps ensure the correct installation of the equipment and prevents seal failure or other faults due to size mismatch.
Sealing Gasket Handling
Separate the sealing gaskets: If the sealing gaskets are adhered to the grooves between the plates, they need to be handled carefully. When using a screwdriver, insert it from the part of the gasket that is easier to peel off and gently pry it open along its edges to avoid damaging the plates and gaskets. For stubborn gaskets, warm water and a mild solvent can be used to soften their adhesion before separation.
Clean the grooves: When replacing new sealing gaskets, first clean the grooves with acetone or other ketone organic solvents. Thoroughly remove old adhesive and dirt from the grooves to ensure a clean and oil-free surface. Then, evenly apply synthetic resin adhesive with a brush to ensure the secure installation of the new sealing gaskets.
Plate Inspection
Puncture inspection: Inspect the plates for punctures, usually with a fivefold magnifying glass for detailed observation. The accuracy of the inspection can be improved by combining it with lighting or kerosene penetration methods. Punctures can affect the thermal exchange efficiency and should be repaired or replaced promptly upon discovery.
Check for debris accumulation: Inspect whether there is debris accumulation at the medium inlets and outlets and channels. Debris accumulation is usually a sign of filter failure, and it is necessary to clean or replace the filter in time to avoid further damage to the heat exchanger.
Cleaning Methods
Backflushing method: For light dirt, the backflushing method can be used for cleaning. This method, which does not require disassembly, uses reverse water flow to flush the heat exchanger plates, suitable for removing minor dirt and deposits.
Manual cleaning method: For more severe dirt, disassemble the equipment for manual cleaning. Pressure water (0.1~0.2MPa) or low-pressure steam jet with water can be used for flushing. For stubborn deposits, a soft fiber brush or a bristle brush can be used. For particularly difficult deposits, consider using appropriate cleaning agents or solvents for treatment.
Chemical cleaning method: For stubborn dirt and deposits, chemical cleaning is an effective choice. After treatment with the appropriate chemical cleaning agent, it is essential to rinse thoroughly with water and wipe with fine gauze to ensure no chemical residue remains. After cleaning, store the plates in a clean environment to prevent contamination.
Cleaning Precautions
Avoid damage: During the cleaning process, especially for stainless steel plates, avoid using steel wire brushes or steel bristle brushes to prevent accelerated corrosion. If there are stains or rust on the plates, special stain removers can be used to clean them.
Water quality requirements: The water used for cleaning must be free of harmful components such as salt and sulfur to avoid secondary pollution of the equipment. Use pure water for the final rinse to ensure no residue remains on the plate surface.
Handling of Titanium Plates
During the disassembly process of titanium plates, avoid contact with open flames to prevent oxidation reactions of titanium. Titanium has high corrosion resistance but is prone to oxidation at high temperatures, so operations should be carried out in a dry and low-temperature environment.
Sealing Gasket Inspection and Handling
Inspect for defects: Carefully inspect the sealing gaskets for signs of aging, discoloration, cracks, or other defects. Replace any defective gaskets promptly and handle them with soft tools to avoid scratches on the surface.
Clean solid particles: Ensure that there are no solid particles (such as sand, iron slag, etc.) accumulated on the surfaces of the sealing gaskets and heat exchange plates (especially in the grooves). These particles can affect the sealing performance, leading to leaks or other faults.
Plate Deformation Inspection
Check for local deformation of the heat exchange plates. Plates with deformation exceeding the allowable value need to be repaired or replaced. Local deformation can affect the thermal exchange effect and even cause equipment failure.
By following the above detailed disassembly and inspection guide, the best results can be achieved during the maintenance of the plate heat exchanger. These steps not only help to identify potential problems but also improve the operating efficiency and extend the service life of the equipment. Regular maintenance and inspection are key to ensuring the reliability and high performance of the equipment. Maintaining the equipment in good condition will help to improve production efficiency and reduce downtime due to faults.

